What is WireGuard?
WireGuard is a modern, simple and secure VPN (Virtual Private Network) protocol. It offers strong encryption, low resource consumption and easy configuration. WireGuard uses a cutting-edge cryptography model to establish secure connections between devices, providing high confidentiality and data integrity. Its minimalist design allows it to be fast and efficient while being easy to implement and audit. WireGuard has become popular due to its simplicity, high performance, and strong security, providing a lightweight alternative to traditional VPN protocols.
Install and use WireGuard
- Install the appropriate WireGuard package on your operating system.
- Generate a public/private key pair for the server and each client.
- Configure the WireGuard configuration file with network keys and settings.
- Start the WireGuard service on the server and each client.
- Add the necessary firewall rules to allow WireGuard traffic.
- Share the server's public key with clients and vice versa.
- Establish a connection by starting WireGuard on each client.
- Check connectivity by performing ping tests or accessing network resources.
- To add new clients, generate their keys and update the configuration.
- Make sure to configure the appropriate security rules and maintain WireGuard software updates to maintain the security of the VPN network.
- Configuring Wireguard Server
- Install wireguard packages:
apt-get install wireguard wireguard-tools net-tools linux-headers-`uname -r`
- Go to the wireguard file:
cd /etc/wireguard/
- Generate the server's public and private keys:
umask 077; wg genkey | tee private.key | wg pubkey > public.key
- Show keys: Order cat
- Show ip: Command ip a
- Create the server configuration file:
nano /etc/wireguard/wg0.conf
Server side configuration file:
Explanation of the contents of the server configuration file:
- Address: Specify the private IP address of the VPN server.
- SaveConfig: The configuration should be saved on shutdown using the current state of the interface.
- PrivateKey: The VPN server's private key, located in the /etc/wireguard/private.key file on the server.
- ListenPort: The WireGuard VPN server will listen on UDP port 51194. Otherwise the default port is 51820.
- PublicKey: The VPN client's public key, located in the /etc/wireguard/public.key file on the client computer.
- AllowedIPs: IP addresses that the VPN client is allowed to use. In this example, the client can only use the IP address 10.10.10.2 inside the VPN tunnel.
- PostUp and PostDown: allows you to place commands when connecting and disconnecting a peer. Useful in the case of connection sharing via VPN.
- MTU (Maximum Transmission Unit): this is a measurement representing the largest data packet that a device connected to the network will accept
(you have to find the ideal value to optimize Wireguard and obtain the best inbound and outbound speeds for the VPN).
- To start the server:
systemctl start wg-quick@wg0
(If you need to modify the configuration file, stop the server: “start” → “stop”)
(If there is a problem, display the status: “start” → “status”)
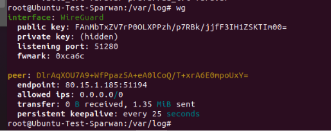
Viewing server information: wg command
-
Setting up the WireGuard client
Configuring client 1 (via adding a GUI plugin on Ubuntu):
- Installation of various packages:
sudo apt install wireguard git dh-autoreconf libglib2.0-dev intltool build-essential libgtk-3-dev libnma-dev libsecret-1-dev network-manager-dev resolvconf
- Recovery of the git folder which will allow us to have the GUI and installation:
git clone https://github.com/max-moser/network-manager-wireguard
cd network-manager-wireguard
./autogen.sh --without-libnm-glib
./configure --without-libnm-glib --prefix=/usr --sysconfdir=/etc --libdir=/usr/lib/x86_64-linux-gnu --libexecdir=/usr/lib/NetworkManager --localstatedir= /var
make
sudo make install
Once this is done we can now go to the network settings and be able to add our famous WireGuard in VPN.
Viewing customer information 1:

Client 1 IP display:
Configuring client 2 (via the WireGuard app on Windows):
Client 2 IP display:
Explanation of the contents of the client configuration file:
- Address: Specify the private IP address of the VPN client. Put on the mask /32 well.
- DNS (optional): Specify 192.168.10.1 (VPN server) as the DNS server.
- PrivateKey: The client's private key, located in the /etc/wireguard/privatekey file on the client computer.
- PublicKey: The server's public key, located in the /etc/wireguard/publickey file on the server.
- AllowedIPs: 0.0.0.0/0 represents the entire Internet, which means that all traffic to the Internet should be routed through the VPN. Otherwise specify the IP class of the VPN network: ex 192.168.10.0/24.
- Endpoint (optional): public IP address and port number of the client.
- PersistentKeepalive: Send an authenticated empty packet to the peer every 25 seconds to keep the connection active. If PersistentKeepalive is not enabled, the VPN server may not be able to ping the VPN client.
As a bonus, the links to 2 tutorials and the WireGuard installation link:
WireGuard: tools and configuration files - FLOZz' Blog

